Showing posts with label SVN. Show all posts

Dec 30, 2007

SVN With Visual Studio 2008

How To Get SourceSafe-Like Features for SVN on Visual Studio 2008 ?

Sometimes, just not too convenient to commit or check modification for files in windows explorer. I need to switch from applications to applications, is a bit troublesm.

It takes me about 1 month to find the best solution at the moment!
( I mean without paying any penny )

Currently I am using AnkhSVN and the settings files below.
For Difference Checking and Merging process, I am using WinMerge and KDiff3.
All of them integrated with Visual Studio IDE too.

Let's see what can we do with this settings solution!
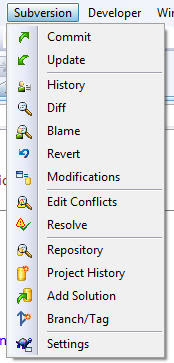
Menu Bar
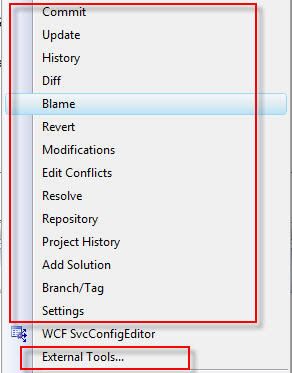

External Tools Menu
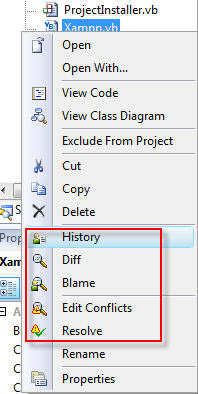

Most Wanted Right Click Menu
( When you select file, folder, project or solution, you will get different menu )
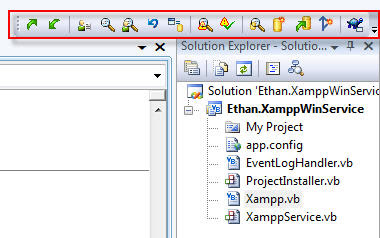

Most Wanted Menu Toolbar

So , for those who like the simplest way, can refer the method below.

Click To Download The Solution For VS2008.

Click To Download The Solution For VS2005.


Steps:

Copy settings file to your visual studio settings folder
1. 'your-domain-user-settings-folder'\Documents\Visual Studio 2008\Settings
2. paste file
a. SubversionMenuToolbarContextsVS2008.settings
(Visual Studio do not allow long file names!!)

Install registry file
(May be you should export and backup your registry first )
1. Copy to any folder of your local machine and run/install this file
a. SubversionMenuToolbarContextsVS2008.vbs

Load settings file to Visual Studio
1. Visual Studio 2008 > Tools > Import and Export Settings
2. Choose Yes, save my current settings and click next button
3. You notice exclaimation mark on the check box.
Expand it and CHECK both checkbox
a. Command Window Aliases
b. External Tool List
4. Click finish and your will get this message.
"Your settings were successfully imported from SubversionMenuToolbarContextsVS2008.vssettings.
"

To Show SVN Tortoise Toolbar
1. View > Toolbars > Subversion

You are done!

Resource modified to suit local development from
http://garrys-brain.blogspot.com/2007/07/tortoisesvn-and-visual-studio.html

Thanks Garrys!


If you want more features, try

a. AnkhSVN at http://ankhsvn.tigris.org/

b. WinMerge at http://winmerge.org/

c. KDiff3 at http://kdiff3.sourceforge.net/

I will write more about it soon!


Related Info:

Oct 12, 2007

SVN Server Setup

Source Control Subversion Server Setup Under Windows

Get SVN Server Tools
http://subversion.tigris.org/ ( original subversion )
http://www.collab.net/products/subversion/ ( CollabNet Subversion)

Get SVN Client Tools
http://tortoisesvn.net/

Get Visual Studio Intergration Add-On
http://www.VisualSvn.com/
http://ankhsvn.tigris.org/


A) Download Subversion

You'll need the latest version of..

B) Install Subversion

  1. Unzip the Windows binaries to a folder of your choice. I chose c:\program files\subversion\ as my path.
  2. Now, add the subversion binaries to the path environment variable for the machine. I used %programfiles%\subversion\bin\

  3. You'll also need another environment variable, SVN_EDITOR, set to the text editor of your choice. I used c:\windows\notepad.exe

C) Create a Repository

  1. Open a command prompt and type
    svnadmin create "c:\Documents and Settings\Subversion Repository"
  2. Navigate to the folder we just created. Within that folder, uncomment the following lines in the /conf/svnserve.conf file:
    [general]
    anon-access = read
    auth-access = write
    password-db = passwd

    Next, uncomment these lines in the /conf/passwd file:

    [users]
    harry = harryssecret
    sally = sallyssecret

D) Verify that everything is working

  1. Start the subversion server by issuing this command in the command window:
    svnserve --daemon --root "C:\Documents and Settings\Subversion Repository"

    You can create shortcut and set the target
    "C:\Program Files\CollabNet Subversion Server\svnserve.exe" -d -r
    C:\Documents and Settings\Subversion Repository
  2. Create a project by opening a second command window and entering this command:

    svn mkdir svn://localhost/myproject

    It's a standard Subversion convention to have three folders at the root of a project:

    /trunk
    /branches
    /tags

  3. At this point, Notepad should launch:

    Enter any comment you want at the top of the file, then save and exit.
  4. You'll now be prompted for credentials. In my case I was prompted for the administrator credentials as well:

    Authentication realm:  0f1a8b11-d50b-344d-9dc7-0d9ba12e22df
    Password for 'Administrator': *********

    Authentication realm: 0f1a8b11-d50b-344d-9dc7-0d9ba12e22df
    Username: sally
    Password for 'sally': ************

    Committed revision 1.

    Congratulations! You just checked a change into Subversion!

E) Start the server as a service

  1. Stop the existing command window that's running svnserve by pressing CTRL+C.
  2. Copy the file SVNService.exe from the zip file of the same name to the subversion\bin folder.
  3. Install the service by issuing the following commands:
    svnservice -install --daemon --root "C:\Documents and Settings\Subversion Repository"
    sc config svnservice start= auto
    net start svnservice
  4. Test the new service by listing all the files in the repository:
    svn ls svn://localhost/

    You should see the single project we created earlier, myproject/

F) Set up the shell extension

  1. Run the TortoiseSVN installer. It will tell you to restart, but you don't need to.
  2. Create a project folder somewhere on your hard drive. Right click in that folder and select "SVN Checkout..."


    type svn://localhost/myproject/ for the repository URL and click OK.


  3. Create a new file in that directory. Right click the file and select "TortoiseSVN, Add"


  4. The file hasn't actually been checked in yet. Subversion batches any changes and commits them as one atomic operation. To send all your changes to the server, right click and select "SVN Commit":


And we're done! You now have a networked Subversion server and client set up on your machine. Note that the default port for svnserve is 3690.


Extra Command:
SVN Client Command: svn
-----------------------
add
blame (praise, annotate, ann)
cat
changelist (cl)
checkout (co)
cleanup
commit (ci) -m "my log message"
copy (cp)
delete (del, remove, rm)
diff (di)
export
help (?, h)
import
info
list (ls) -v
lock
log -v
merges
mergeinfo
mkdir
move (mv, rename, ren)
propdel (pdel, pd)
propedit (pedit, pe)
propget (pget, pg)
proplist (plist, pl)
propset (pset, ps)
resolved
revert
status (stat, st) -u -v
switch (sw)
unlock
update (up)


SVN Admin Command: svnadmin
-----------------------------
crashtest
create
deltify
dump
help (?, h)
hotcopy
list-dblogs
list-unused-dblogs
load
lslocks
lstxns
recover
rmlocks
rmtxns
setlog
setrevprop
verify


SVN Look Command: svnlook
--------------------------
author
cat
changed
date
diff
dirs-changed
help (?, h)
history
info
lock
log
propget (pget, pg)
proplist (plist, pl)
tree
uuid
youngest


SVN Dump Fileter Command: svndumpfilter
----------------------------------------
exclude
include
help (?, h)


SVNServe Daemon: svnserve
---------------------------
svnserve -d -r /path/to/repo

SVN Windows Service
---------------------------
sc create svn
binpath= "C:\svn\bin\svnserve.exe --service -r C:\repos"
displayname= "Subversion Server"
depend= Tcpip
start= auto

C:\> sc create svn
binpath= "\"C:\program files\svn\bin\svnserve.exe\" --service -r C:\repo
displayname= "Subversion Server"
depend= Tcpip
start= auto


C:\> net stop svn
C:\> net start svn